Warning: This page reflects current state of the modification. This page is still under construction and so it may not contain things that you are looking for. Please do not hesitate to contact me if you have some ideas on what is missing here (available contact ways are on the bottom of this page).
How to start
As of version 0.71, the only way to try out this modification is through a multiplayer session. Please keep in mind that there is no RTS AI (your opponent needs to be human – if you want to get into some conflict – you can still play alone, it will just be a base building simulator basically). To start a multiplayer session, go to Multiplayer and choose Host server. Choose Pliocen as a map. Since version 0.71, you have two options to choose from:

Domination mission is meant to be for a longer sessions (usually between 1 and 3 hours) and more experienced players. It also follows lore of Original War very closely (in the way sides are distributed alongside with resources). Please scroll to the bottom of this page to find out more about this mode.
Skirmish mission is meant for a shorter sessions (0.5h-1h) and is very much recommended to people who want to have quick action. Please scroll to the bottom of this page to find out more about this mode.
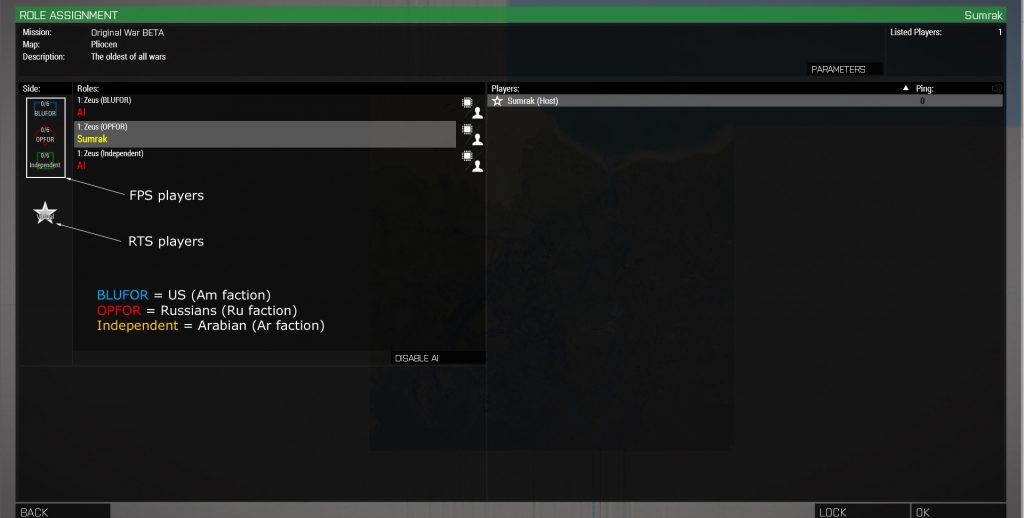
After choosing your mission, you will get to multiplayer lobby screen. Here, you can see available slot within selected mission. There are two types of slots (all sides have the same
- member of faction (FPS player, up to 18 players total)
- virtual player (RTS player, one per faction).
As of 0.71, Arabian (green faction in multiplayer selection menu) side is not completely supported (no research, no buildings and vehicles) so I do not recommend joining that faction yet.
Before starting a multiplayer session, you can also change some of the parameters for the mission (by clicking button Parameters). These can for example affect how much reinforcements (and how often) you get during the mission. You can also change amount of siberite and oil deposits across the map.


Basic controls
If you are not familiar with Arma 3, I definitely recommend going through a bootcamp campaign first in order to get the feel of Arma 3 first. Playing as a virtual player (RTS mode) only adds more complexity to it (as you have take control of AI units and thus transform yourself into FPS player too). Here is a short list of shortcuts you may want to use when playing as a virtual player (RTS):
- g – order unit to get out of the vehicle or building (necessary to use, button to order get out do not work properly, AIs tend to get in after exiting otherwise)
- f – move camera to selected unit position
- left ctrl – rotate building ghost before LMB confirmation of actual build process
- backspace – hide / show RTS GUI
- n – nightvision
Basics of Arma 3: Original War gameplay
Following text explains basic skirmish play that is available in Arma 3: Original War. I think it is worth to mention that if you try the original game – Original War (the game that this mod is based on), you will understand most of this mod’s gameplay features automatically.
Resources
Personnel – People are the most valuable assets that you can possibly have in Original War. If you manage to loose anyone, you will surely sooner or later notice it by falling behind the progress of your opponents. Depending on the mission settings (described earlier), you can have up to 20 personnel (starting at 6, rest appearing throughout the game – time between their appearance gets longer each time you receive one). Pay a lot of attention in late game as many of the powerful late-game weapons deal a lot of damage to individual personnel. Personnel do not take any damage when located in buildings or vehicles.
Crates – Everything has to be build on site from a standard-sized resource crates that spawn across the whole map in random quantities. All sides of the conflict have figured out that there is an actual pattern in their appearance (location and time) and with a little bit of research, conducted by scientists in laboratory, locations of incoming supplies can be predicted in advance. It is not necessary as any incoming supply is accompanied by loud bang and flash of light, but it can help a lot and when there are some FPS players as workers, they can continuously use information from this tech to gather as much resources as possible while RTS player deals with base management and other things. As mentioned, crates can be picked up by any worker personnel and has to be carried into some warehouse in order to be usable. You can also manufacture cargo vehicle (medium – 50 crates, heavy – 100 crates) which dramatically speed up process of collecting crates.
Resource deposits – While US and Arabian factions can run exclusively on crates (they can utilize solar power – assuming they don’t mind blackout during night-time), Russian side is required to locate oil deposits as soon as they start (but is it recommended for all – always better to have more resources to utilize). Ultimately, you want to locate Siberite deposits as this resource is the reason you were sent there, but locating these deposits require a basic technology to be researched first (which means starting a base first, so focus on searching for oil first). Locating deposits can be done only by ordering scientist to simply move around the area of interest. If there is something, they will let you know about it. Frequency of these deposits can be tweaked through mission settings (described earlier).
First steps
You always get 6 personnel when you start the mission. These are normally AI personnel (can be freely controlled by RTS player), but can be all real players (warning: these cannot be controlled by RTS player, communication between RTS and FPS players is essential). There are 4 classes for each personnel available:
- Soldier – firearm carrier, can also be medic or carry advanced gear (both costs additional resources)
- Worker – can build structures and carry resource crates
- Mechanic – can manufacture and repair vehicles
- Scientist – can research technologies inside laboraty and detect resource deposits
Each personnel can be transformed into different class without any costs (with a small exception of upgrading basic gear of soldiers) by entering appropriate building in your base (you can transform unit into scientist in laboratory and so on). Keep in mind that each personnel has different experience in these classes. While they gain experience over time (if they do what each class is supposed to do), but it is definitely recommended to keep an eye on their class levels and . Each personnel has toggle between active and passive modes. You can choose with this whether selected unit should be actively looking for tasks that its current class is supposed to do (example would be workers carrying crates back to warehouse) or if it should stay on one place.
Choosing a spot for the first base is an important first step. As mentioned earlier, you essentially want to build a base near some oil deposit (ideally more). So make sure you use all available scientists to search for closest deposits around your starting place. Fundamental building for each base is Warehouse. This building costs nothing and it allows you to build other buildings around it. Range of each warehouse is visible in build mode (warehouse is ghost, build process not yet confirmed with LMB). Keep in mind that this is the max range, that is available when already built warehouse is upgraded and so the range of basic warehouse a bit lower (nothing prevents you from upgrading it to advanced warehouse later though as it is tech free upgrade with some minor crate costs).
Skirmish mode
Skirmish mode was introduced in update 0.71 and it features new mission, in which you can select one of the 6 available skirmish locations on Pliocen map. Location has to be selected in advance of the mission start through mission parameters (described earlier on this page). Each location has its own unique name.
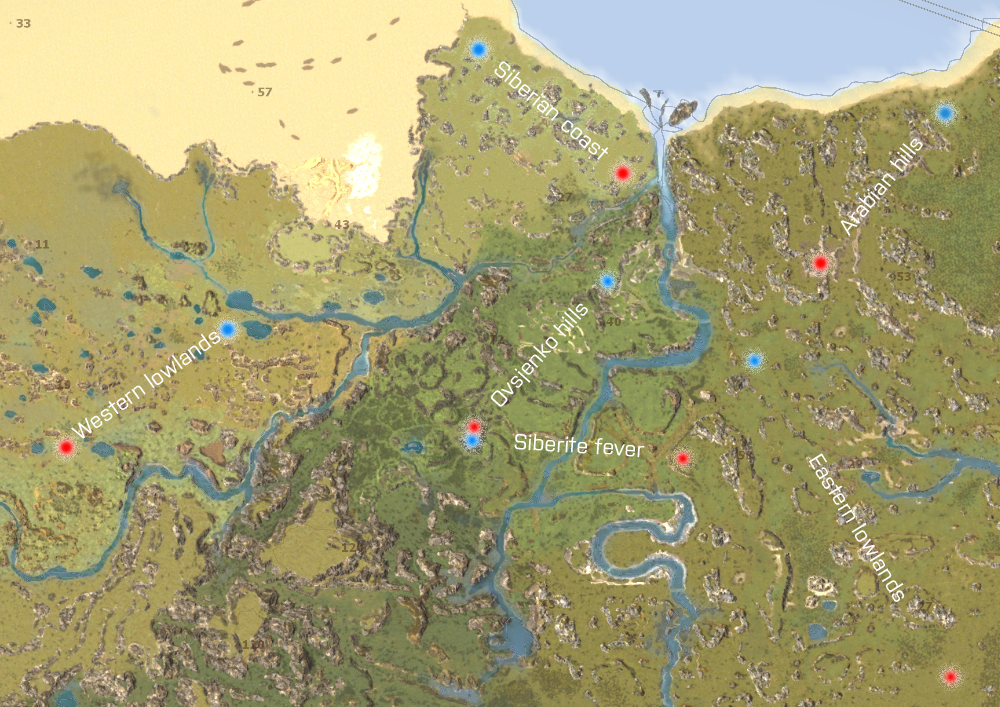
In this mode, resource deposits are scattered only between two opposing forces (no, you cant harvest primary siberite deposit). The goal of each side of the conflict is to kill all personnel of the other side.
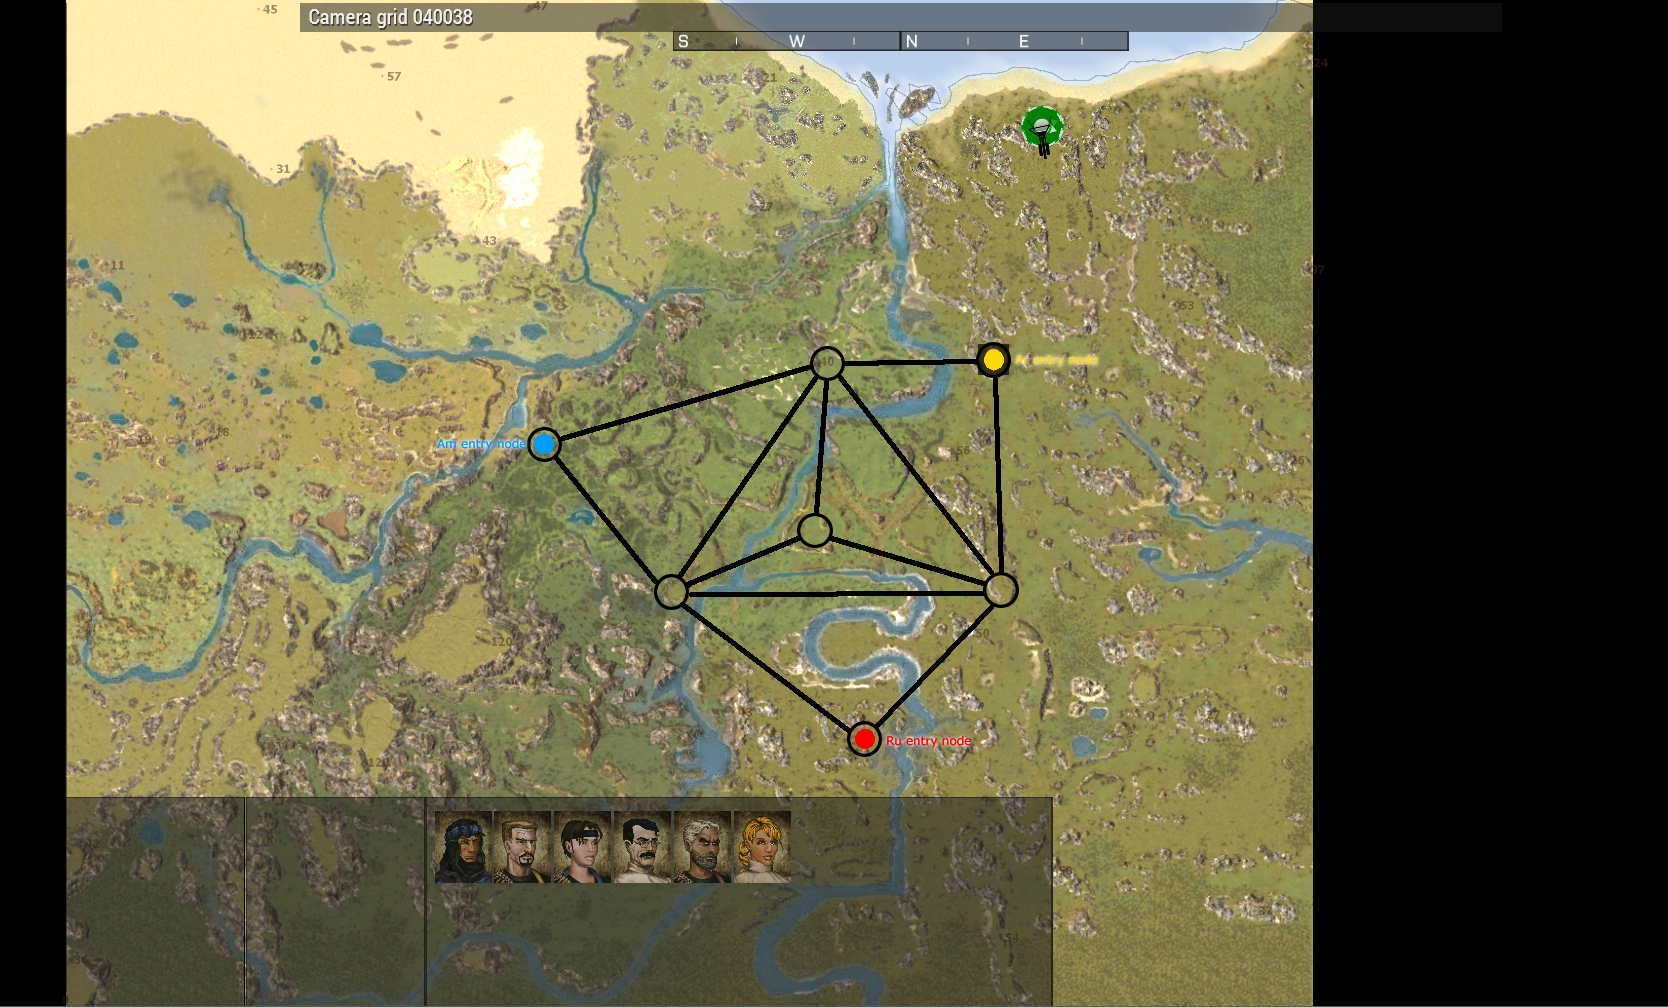
Domination mode
The ultimate goal of this mission is to capture primary siberite deposit. After that, you need to hold it long enough to collect 1,000 units of siberite. Faction that manage this, wins the skirmish. There are however additional rules applied on how to exactly proceed before capturing primary siberite deposit. In order to capture primary deposit, you need to capture 1 entry and 2 middle nodes. Capture is done by building a Control Tower (basically a warehouse with position and resource rules applied). Each Control Tower requires 50 crates in a cargo vehicle that is in vicinity of the planned site for it. Control Tower can only be built on one of the following nodes. If one is already there, it has to be deconstructed / destroyed first. Domination mode can be switched on or off within the domination mission itself (it will lift warehouse restrictions around central parts of the map). Turning off domination mode will turn the mission into an ultimate sandbox.
Tips and tricks
- Please do not forget to visit Development section for list of Known issues.
- Resource mines can be upgraded by researching basic / siberite tech levels (once research is finished, select resource mine and click on upgrade button), makes resource gain faster, power plants are also affected (bigger power output), but these are upgraded automatically.
- If you are lucky to have enough real players under your command, make sure you manufacture them cargo vehicles – they can collect resources much more effectively (assuming you have research tech for crate prediction / pinpointing), because you (RTS player) have enough things to manage already.
- Upgrading basic soldier gear to advanced is a bit tricky in current version. In order to get the upgrade options, selected personnel has to be soldier and inside barracks (do not deselect him after giving an order to enter barracks).
- Use your map often to plan waypoints for your personnel as it is much faster than in 3D space and still quite accurate (for example get in waypoints have to be made on the building icon, much easier to access on the map)